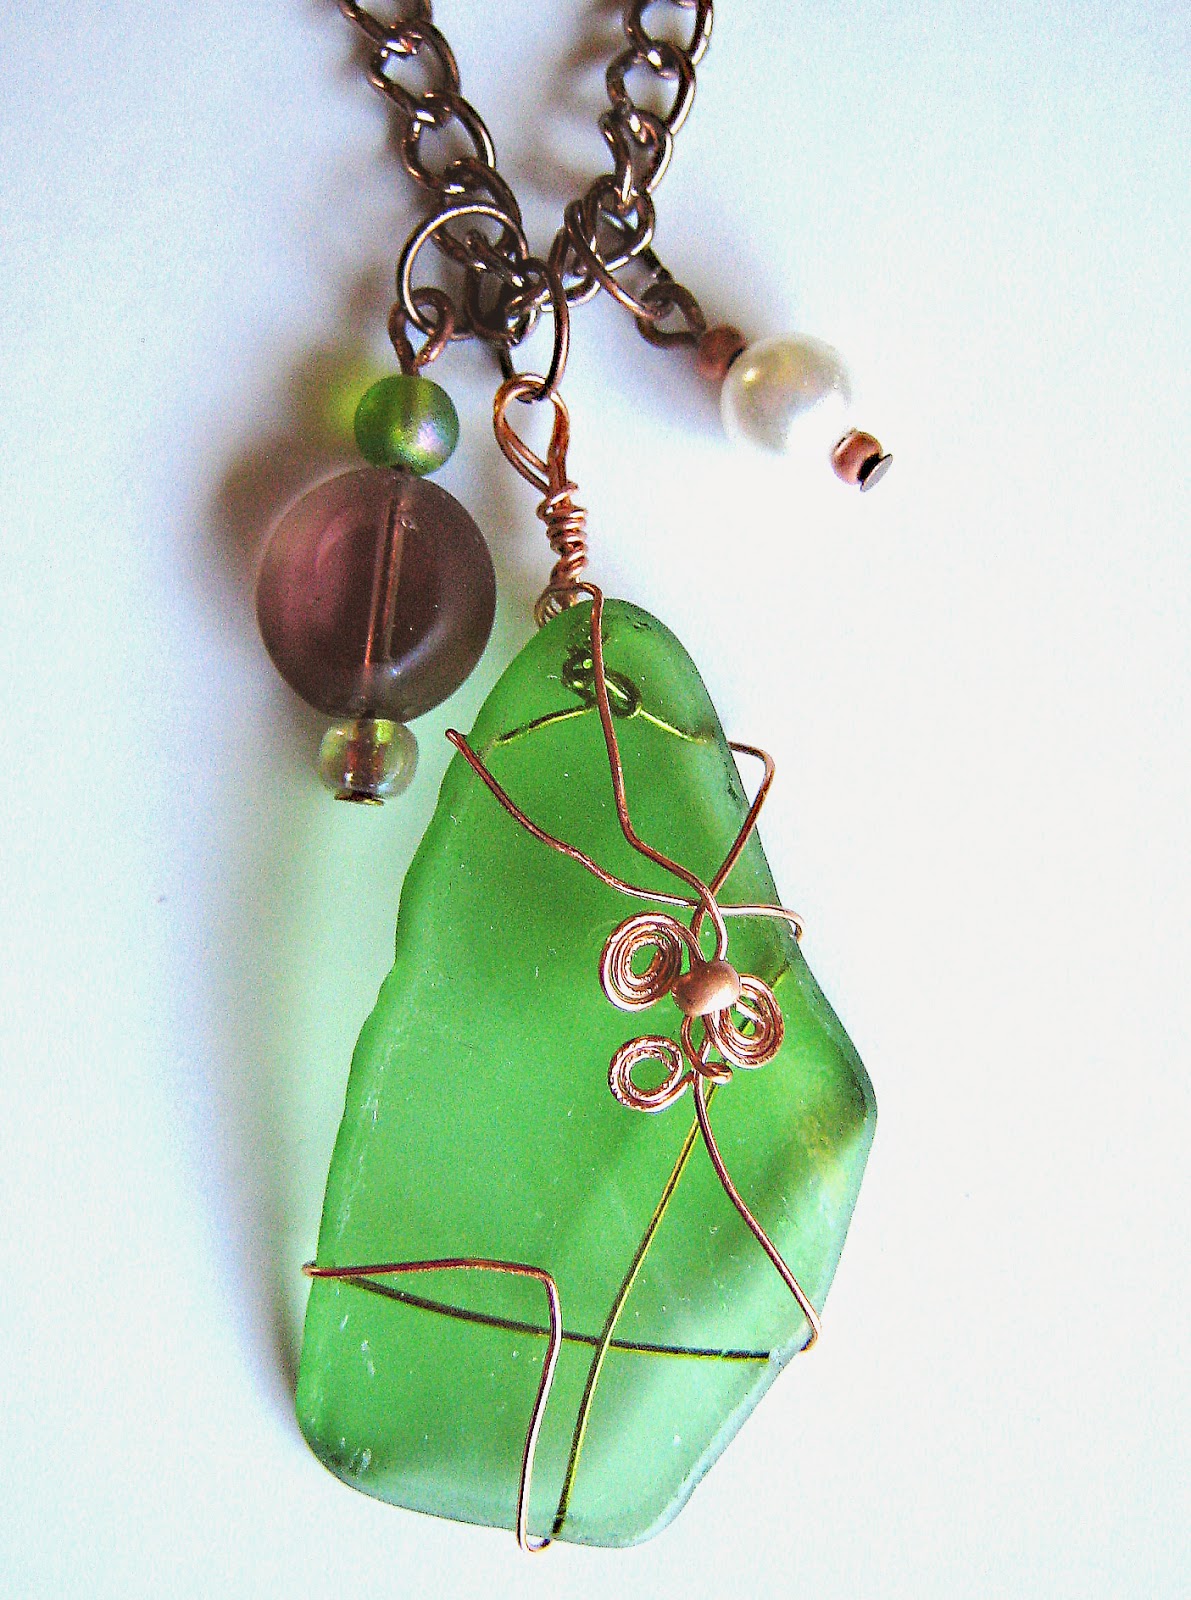
I've got way to many materials to recycle, including all the bottles from the kitchen renovation. I finally used some to make a wire wrapped necklace. I had my husband slice the rim of a beer bottle off and I filed down the edge of a chip from the same bottle for this creation.
Showing posts with label eco friendly. Show all posts
Wednesday, July 16, 2014
Saturday, December 22, 2012
Alehouse Amber Counter Top
Today the counter top fabricator came to make the template for our recycled glass counter tops. Later in the day we drove up to his shop to inspect the two slabs that will be used.
I love these Vetrazzo counter tops even more now that I've seen the full slabs. The small sample pieces or online photos just don't do it justice. Certain pieces of the glass chips have so much sparkle & add such depth. I can't wait for them to be installed in a few weeks...so glad I splurged on my eco friendly counters.
![]() |
| Alehouse Amber by Vetrazzo |
Wednesday, November 7, 2012
Bamboo Cabinets Ready for Assembly
The beautiful bamboo kitchen cabinets have finally arrived. They are now stacked up in two rooms in the house waiting for us to finish the walls & floor so we can assemble them and install them.
Tuesday, October 23, 2012
Last Minute Recycled Gift Bag
Finally a crafty post instead of a reconstruction one.
We got a last minute invitation to a birthday party for our friend's son. I managed to squeeze in some shopping time for a present, but when I looked through my stash, I had no wrapping paper or bags fit for a 6 year old. Most of my craft supplies, glues sticks, glues, etc. are all packed away in storage while we're doing our home renovation, so I couldn't make my usual upcycled gift bag. But if you save enough junk like I do, you can always find something usable. Another of my friends (who's received a few of my recycled calendar gift bags) now hands me down her calendars at the end of the year & I found one stashed in the bookshelf. I also had a Williams Senoma shopping bag. I just cut out 2 cute pages from the calendar & taped them on the bag. Since the sides of the bag said williams-senoma.com down them, I cut a strip of some used wrapping paper that said 'Happy Birthday' and taped over that too. Quick, easy & pretty cute to boot!
Thursday, September 13, 2012
Monday, February 27, 2012
Featured on Saved By Love
A big Thank You goes out to Saved By Love Creations for featuring my Shag Pillow in their post on 50 Recycled T-shirt projects. It's really wonderful to be included with so many other incredible recycled projects. My favorite among them is the Pink Rosette Purse from Come Together Kids, but all of the projects are wonderful.This post has really upped my traffic, it's so wonderful that everyone is enjoying the pillow. Needless to say, they've been added to my blog roll, give them a visit.
Labels:
blogs,
eco friendly,
handmade,
how-to,
ideas,
pillows,
recycled,
recycling,
repurposed,
throw pillows,
tutorial,
upcycled
Friday, November 25, 2011
New Flower Bobby Pin
A new flower bobby pin just listed at the Reformatory. I tried a little something different with this one. I put the flower at the open end of the bobby pin. That way if you are pulling back bangs or the front section of your hair, the flower is at the far end of the bobby pin. I like the way it looks, will be making more this way. This ones also eco friendly, all fabric is upcycled.
Saturday, November 19, 2011
Miniature Rose Flower Ponytail Holders
I make loads of fabric flowers hair accessories but usually for adults. I recently started adding some for small girls, toddlers or babies. These are two rose buds, only about 1" in diameter and made of upcycled fabrics. The ponytail holders are the small elastics also about 1" diameter. Look for them and some tiny hair clips in my hair accessories section on Etsy.
Thursday, November 18, 2010
Eco Friendly and Recycled Inspiration
What can I make from items I already have on hand? Can I put something together that doesn’t require me having to go buy anything new? That’s always my first question when I start a new project, be it an item for my shop, a gift for someone special or a project around the house.
This month I created two purses from old fabric pieces and zippers & buttons I already had on hand. For my upcoming mini-market, I needed some packaging for small items , so I made some origami boxes from magazines I intended to recycle.
My two nieces both have birthdays this month, so I created numerous fabric flower hairclips (all of them from various remnants and vintage buttons) a few of which one niece will receive. My other niece wanted a tote bag for schoolbooks. I had her look through my fabric remnants and the old jeans I recycle and I patched together what she chose into a tote bag I’d love to use myself. I even used an old belt for the handles (post pics later -haven’t had the party yet).
Wednesday, October 27, 2010
I’m a Finalist
Two of my creations have made the finals in the Recycled Denim Challenge on Ecouterre. I’m so excited to be part of this eco friendly competition. Ecouterre and it’s mother website Inhabitat are great eco/green websites to explore for inspiration, wonderful new designs and creative creations. There are links on my sidebar if you’d like to vote for me or explore the other finalists in the competition.
Labels:
competition,
crafts,
Denim,
eco friendly,
Ecouterre,
green,
Inhabitat,
recycled
Wednesday, April 28, 2010
I Love Repurposing Things
I was thrift shopping last week and spotted a cute summer top, it was even 50% off, but it was too small for me. I was going to put it back, but was just in love with the print. I also decide I liked the gathered straps and then decided it would make a cute shopping tote. So I brought it home, ripped out the seams and remade it. Look for it in my Etsy Shop. I hate plastic bags and I’m so into the reuseables now, I keep 2 in my purse all the time and hope to make some more for my shop soon.
Wednesday, January 13, 2010
Nico Designs - Blogger of the Month
Lets celebrate one of our wonderful EtsyBloggers Team members. Our January Blogger of the month is Erika of Nico Designs. She makes wonderful bags, accessories and baby stuff. She’s eco-friendly, using all cotton fabric and repurposed materials. And her blog is chock full of nice tutorials and recipes and all kinds of other great stuff. Show her your support, because she volunteers for the Team and supports all of us.http://www.etsy.com/shop/NicoDesigns
http://designsbynico.blogspot.com/
Monday, July 20, 2009
Renovation Existing Tile
When renovating a bathroom, most home improvement sites and books will recommend completely ripping out all the fixtures and tiles and updating everything. They say that you will usually recover the cost when you resell the house. That’s fine if you can actually afford the thousands of dollars in demolition and replacement. Many of us don’t have those resources. And with the current housing slump and home values having dropped dramatically, sinking thousands into a renovation may not pay off.
I have updated both the bathrooms in my home without replacing all of the tile. I have redone just portions of it. I did it myself, and it does involve some delicate precision and hard labor. I’m not sure tile contractors would like my approach either. Hiring someone to do this work may not be easy as they most likely feel it’s easier to tear it all out and then cover a clean flat wall.
Easy doesn’t always mean best for the environment. My approach is to preserve as much vintage tile as possible and to add as little as possible to the waste stream. Where does all that old tile end up? Probably a landfill. Maybe if it were being recycled for some other use, it wouldn’t bother me so much, but most of the time, you see large amounts of construction waste just packed up into dumpsters and trucked away.
Here’s what I did with the 1st renovation. We had broken tile on the windowsill, some edge tiles at the floor that were cracked, a broken ceramic wall mounted towel rack and worn out ceramic soap dish and toothbrush holders above the wall hung sink. After removing the sink, we also found holes through some tiles and cracks in others.
I loved the 50-year-old tan speckled tile but knew I probably wouldn’t be able to match it. The room had black edge tile, so I had to come up with a pattern to insert black tile to fill in the spaces where I removed the broken stuff. It required placing black tiles where the new towel bars would attach to the walls, black tiles on the new windowsill and a few rows of black behind the sink. It also involved preserving at least one tan tile to fill in a spot where one towel bar was removed. Getting tiles off in one piece is the trickiest part & mostly comes down to luck.
Here’s a few links on how to replace a broken tile…
http://www.thisoldhouse.com/toh/how-to/intro/0,,20051584,00.html
http://www.ehow.com/how_114958_replace-cracked-tile.html
perhaps I’ll post more about my own repair work at a later date as this is already getting too long winded.
I have updated both the bathrooms in my home without replacing all of the tile. I have redone just portions of it. I did it myself, and it does involve some delicate precision and hard labor. I’m not sure tile contractors would like my approach either. Hiring someone to do this work may not be easy as they most likely feel it’s easier to tear it all out and then cover a clean flat wall.
Easy doesn’t always mean best for the environment. My approach is to preserve as much vintage tile as possible and to add as little as possible to the waste stream. Where does all that old tile end up? Probably a landfill. Maybe if it were being recycled for some other use, it wouldn’t bother me so much, but most of the time, you see large amounts of construction waste just packed up into dumpsters and trucked away.
Here’s what I did with the 1st renovation. We had broken tile on the windowsill, some edge tiles at the floor that were cracked, a broken ceramic wall mounted towel rack and worn out ceramic soap dish and toothbrush holders above the wall hung sink. After removing the sink, we also found holes through some tiles and cracks in others.
I loved the 50-year-old tan speckled tile but knew I probably wouldn’t be able to match it. The room had black edge tile, so I had to come up with a pattern to insert black tile to fill in the spaces where I removed the broken stuff. It required placing black tiles where the new towel bars would attach to the walls, black tiles on the new windowsill and a few rows of black behind the sink. It also involved preserving at least one tan tile to fill in a spot where one towel bar was removed. Getting tiles off in one piece is the trickiest part & mostly comes down to luck.
Here’s a few links on how to replace a broken tile…
http://www.thisoldhouse.com/toh/how-to/intro/0,,20051584,00.html
http://www.ehow.com/how_114958_replace-cracked-tile.html
perhaps I’ll post more about my own repair work at a later date as this is already getting too long winded.
Subscribe to:
Posts (Atom)