

Showing posts with label cabinet. Show all posts
Showing posts with label cabinet. Show all posts
Saturday, May 18, 2013
Organizing the New Kitchen
Wow, I didn't remember us having this much crap. I've already organized the pantry and put away the plates, glasses & cups, but I keep finding more & more boxes of dishes (mostly pots & pans & plastic containers). Even though we have more cabinet space than we used to, I seem to be baffled about how to put away and organized all theses dishes.


Friday, February 15, 2013
Kitchen Renovation Winding Down
We’re finally approaching a completed kitchen. We’ve been drilling the holes to put the hardware on the cabinets and get them hung, but it turned out that we didn’t get a few of the hinges that connect the two piece doors for the corner cabinets. They arrived yesterday, so we should be able to finish hanging and adjusting the doors this weekend. We still have the backsplash left to complete and to finish getting the bottle bottoms mounted in the bar.


Thursday, January 31, 2013
Bottle Bottom Valance
We finally finished mounting the bottle bottoms in the valance & connected it to the cabinets. We just love how it came out, can't wait to finish the bottles on the bar counter. Of course we had to take took it back down this morning as the electricians are here to install all the light fixtures and outlets. Little by little, we're finally approaching the end of this overdue project.

Wednesday, December 19, 2012
Installing Kitchen Cabinets
Those beautiful Bamboo cabinets are finally getting installed. At first it was a bit of a shock seeing the large open room & my new floor getting covered over by the cabinet carcasses. Made the room start feeling crowded. But after enough of them got placed, the design started to come together and I'm getting psyched. Can't wait till the doors & handles get put on.
The installation videos make it seem like a quick easy job, but to do a quality job, it takes a lot of leveling, shimming and interconnecting of the cabinets. It didn't go quite as quick as even my contractor expected, probably because he's as much of a perfectionist as I am...and of course his helpers are us amateurs & he's always taking time explaining every step to us. So far it's looking great!

The installation videos make it seem like a quick easy job, but to do a quality job, it takes a lot of leveling, shimming and interconnecting of the cabinets. It didn't go quite as quick as even my contractor expected, probably because he's as much of a perfectionist as I am...and of course his helpers are us amateurs & he's always taking time explaining every step to us. So far it's looking great!
Wednesday, November 7, 2012
Bamboo Cabinets Ready for Assembly
The beautiful bamboo kitchen cabinets have finally arrived. They are now stacked up in two rooms in the house waiting for us to finish the walls & floor so we can assemble them and install them.


Thursday, September 13, 2012
Friday, July 6, 2012
Hilarious "How to" for installing hinges

Saturday, June 9, 2012
Kitchen Renovation Project About to Begin

Well we’ve signed the contracts and the kitchen renovation / house rewiring project will be starting soon. It’s going to be quite a mess here for who knows how long. I have to clear all the art work off the walls, pack up all the small stuff & move all the furniture to the center of the rooms to access all the electrical outlets & switches for the rewire. Then after that, the demo of the kitchen will begin. We can’t wait to clear out those rotten old cabinets & the old floor. But I’m not looking forward to the hassle of peeling that disgusting wallpaper off the ceiling (what were my in-laws thinking when they put that up there?)
Tuesday, June 5, 2012
New Kitchen Cabinets
 |
| Bamboo Cabinets |
 |
| Maple Slab Door |
The original bamboo cabinets I had found are no longer available, so I had priced some slab front maple cabinets that were available locally. Then a few weeks ago while searching microwave cabinet ideas, I came upon a new source for bamboo cabinets. I’m still waiting on the sample door and hoping it fits the bill because they carry more of the cabinet sizes I prefer for my layout.
Friday, January 14, 2011
When it comes to Kitchens, It’s Not Easy Being Green
…at least not if you’re trying to be affordable. When we began planning our new kitchen, we hoped to build green. We wanted energy efficient appliances, cabinets from sustainable materials with low VOC glues & finishes, recycled countertops, green flooring. Well that’s all well & good if you’re a Rockerfeller.
Most of the kitchen sites we looked at say it’s not a whole lot more to buy green cabinets. What they mean to say is it’s not that much more than ordering custom cabinets.

We wanted to get bamboo cabinets, most of what we found was only available out west, California, Oregon, etc. Not many made here in south Florida unless you buy custom made. We were quoted around $10K for just the cabinets. That’s about half of our whole kitchen budget. There are RTA bamboo cabinets available online that are in our price range. Although most are built with plywood cores, which are better quality, there’s no telling how bad the VOC’s in the plywood or the glue attaching the veneers are.
Then I came across the retro renovations blog and started looking at vintage metal cabinets, Youngstown, Geneva, etc. I was immediately drawn to the vintage look for our 1947 built home. But again, Florida was the problem. To find these vintage cabinets you need to go to the northeast or midwest states. Then you have to find pieces that fit your layout and most likely have them repainted.
 I spent months drooling over listings for these wonderful old cabinets and then came across a story on their blog a women posted about her renovation. It cost her $5K for her cabinets after purchase, transporting & refinishing & she lived about 20 miles from where she found them. Plus it was only one wall of cabinets. I decided it would be too much to pursue the vintage cabinets. St. Charles has started re-manufacturing their metal cabinets, but I can tell by looking at them they are most likely out of my price range too. I emailed our closest dealer but never got a reply.
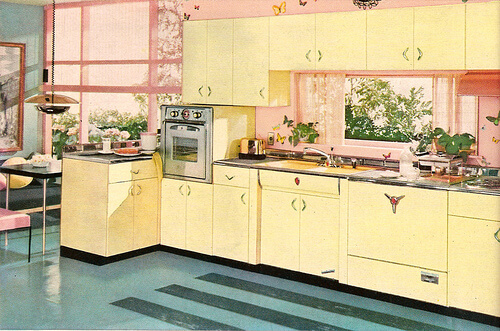

So I have been keeping my eyes out in the classifieds for used cabinets. They may not be built green originally, but recycling would make them green. But so far I haven’t found any that I can use yet.
Most likely we’ll be getting RTA cabinets, perhaps bamboo, perhaps somewhat green. It does appear since California passed a law pertaining to the VOC’s in plywood, that most of the plywood used today is meeting their standard, so that’s a plus I hope.Wednesday, June 10, 2009
My Earring Cabinet


Being an earring junkie, it tends to be hard to find a place to store them all, or to locate the pair I want. I decided I needed a cabinet. I envisioned something similar to a CD cabinet that provides storage on the doors when they open.
I went to Lowes and bought some 1x3x2’ boards to build the boxes. Originally I had intended to also put necklaces in the box, hence I chose the 1x3’s, but 1x2’s probably would have worked fine and the box would have been a bit less deep. I decided widthwise to make each door out of a 1x6, and so I also bought some ¼”x6” craft boards to glue together to form the back. I decided to make the doors slightly larger than the box so that I could put a decorative curve on the top, something to match our wooden window valances in the bedroom. The extension on the bottom works as a door handle. I also wanted a shallow band across the bottom of each section to stop anything that fell from dropping out. I just went with some flat ¼” trim molding. I measured the pieces and marked my curved top and my husband cut them for me. He used his router to make a groove to recess the bands across the bottom. I just used a simple butt joint and screwed the boxes together and glued & nailed on the front & back. My original idea was to put in rows of wire and wrapped them around screws to hang my dangle earrings over. I tried getting the wire taught, but all the earrings kept sliding toward the middle. Then my husband had a great idea, remembering the pile of martigras beads we had. So we cut the strands, strung them across and around the screws, wedging a bead between the screw and the side of the box. They work great because the beads separate each pair of earrings. Originally I had left the sides off the middle of the doors (I thought they might bind together when opening and closing) but I ended up adding a strip of the ¼” molding to finish off the edge and cover the ends of the screws & beads.
I own a few pairs of post earrings, so I used some wire and formed a small hole and loop, so I could attach the earring thru the hole and hang them in the box too. It’s kind of a pain, so I end up not always putting them away properly. I’m considering adding a strip of needlepoint mesh in place of the beads, but haven’t tried it yet, or perhaps I’ll find another solution.
I finished it off by painting it white and modifying the stencil from the window valances up the front. The lovely vintage hinges I used on the sides came from our Aunt’s old house. Now I have plenty of room to make and store new earrings.
This idea can be adapted to any size and I have also included a picture of a similar but smaller earring holder I made for my sister using a wooden picture frame and strung beads. I just used some decorative paper across the back. A sheet of needlepoint mesh would also work well if making one from a picture frame.
I went to Lowes and bought some 1x3x2’ boards to build the boxes. Originally I had intended to also put necklaces in the box, hence I chose the 1x3’s, but 1x2’s probably would have worked fine and the box would have been a bit less deep. I decided widthwise to make each door out of a 1x6, and so I also bought some ¼”x6” craft boards to glue together to form the back. I decided to make the doors slightly larger than the box so that I could put a decorative curve on the top, something to match our wooden window valances in the bedroom. The extension on the bottom works as a door handle. I also wanted a shallow band across the bottom of each section to stop anything that fell from dropping out. I just went with some flat ¼” trim molding. I measured the pieces and marked my curved top and my husband cut them for me. He used his router to make a groove to recess the bands across the bottom. I just used a simple butt joint and screwed the boxes together and glued & nailed on the front & back. My original idea was to put in rows of wire and wrapped them around screws to hang my dangle earrings over. I tried getting the wire taught, but all the earrings kept sliding toward the middle. Then my husband had a great idea, remembering the pile of martigras beads we had. So we cut the strands, strung them across and around the screws, wedging a bead between the screw and the side of the box. They work great because the beads separate each pair of earrings. Originally I had left the sides off the middle of the doors (I thought they might bind together when opening and closing) but I ended up adding a strip of the ¼” molding to finish off the edge and cover the ends of the screws & beads.
I own a few pairs of post earrings, so I used some wire and formed a small hole and loop, so I could attach the earring thru the hole and hang them in the box too. It’s kind of a pain, so I end up not always putting them away properly. I’m considering adding a strip of needlepoint mesh in place of the beads, but haven’t tried it yet, or perhaps I’ll find another solution.
I finished it off by painting it white and modifying the stencil from the window valances up the front. The lovely vintage hinges I used on the sides came from our Aunt’s old house. Now I have plenty of room to make and store new earrings.
This idea can be adapted to any size and I have also included a picture of a similar but smaller earring holder I made for my sister using a wooden picture frame and strung beads. I just used some decorative paper across the back. A sheet of needlepoint mesh would also work well if making one from a picture frame.

Subscribe to:
Posts (Atom)
LinkWithin
